
-Mobile Toolkit: You may have seen in my Ferrari 312T4 WIP that I talk about my mobile tool kit or bag. Essentially, because I have a very busy life without a whole lot of time for building models, I have developed a kit bag using an old soft-sided fishing tackle bag. I have a self healing mat that is the exact size of the base of the bag which helps it hold my kit more or less in a well organized way. Being a Marine and having lots of experience packing for the field, I like having everything with a place and everything in its place. I have my sharp tools in hard-sided pen and pencil cases, then along the top have multiple transparent kevlar pencil cases from Blick Art Store that are sorted into sandpapers, files, sanding sticks, tweezers, scribes, sprue-cutters, etc.. I carry a small jar of CA, Tamiya Thin, and putty also. A breakdown bag that houses resealable bags of every sort, a bunch of large and small old prescription bottles, and a sharpie round out the kit. The kit allows me to take small parts that I’m prepping or working on with me to the bedroom, to the living room to watch TV, or even to work on processing Saturdays when there’s not a lot going on.
Check back soon as I’ll add photo’s and list out the products and unlikely items I use in my tools. I’ll also be listing my airbrush tools and over in the painting page will cover laquers, enamels, acrylics, and even inks and how I shoot acrylic hobby paints that come $0.99 of the shelf at your local Wal-Mart or Crafts Store.
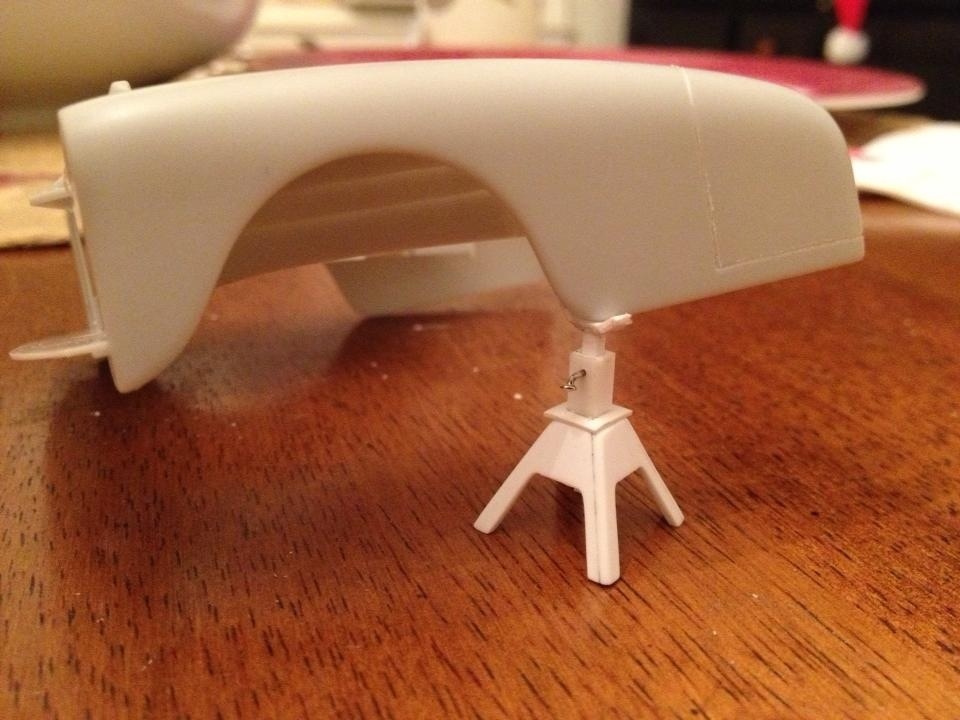
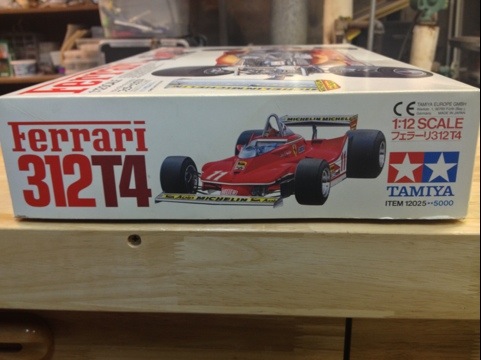
19 Nov Update- Received the unbuilt model today…. all the pieces appear to be accounted for. There are only a few parts separated from the sprues, but of concern is that the nose cowling molded in chrome is one of them. It looks as though it’s been bumped around quite a bit over the last 20+ years, but looking through a plastic bag; I can’t really tell. I’ll deal with that on another day though. The decals however are absolutely horrible and I will have to order some aftermarket to do the job
**Feel free to make a recommendation if you know of some good ones**
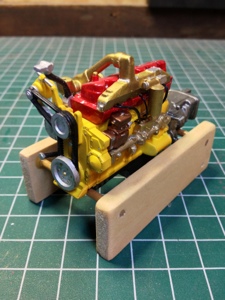
As with any kit, the first thing I’m going to do is to say the hell with the instructions and go straight for the engine! (It’s the American way!) Parts: A21, A17 (Engine Block), A20, A56 (Block Ends), and A18, A19 (Head Covers) are removed from the tree immediately. I already have them in a kevlar bag upstairs in the bedroom with my mobile tool bag and will trim the sprue bits off before I go to bed tonight. Test fitting that will make me feel as though I’ve actually begun this build. I have about 5 different shades of aluminum and steel Alclad that are going to bring this huge 12 cylinder Ferrari Boxer engine to life. The clutch is a Borg & Beck driven by a Ferrari 015 Trasversale transmission. More to come, but aside from the decal let down I’m very happy with the unboxing of the Ferrari 312T4.
-Thanks for looking
Follow along in the WIP area http://wp.me/P1eftU-5q : or @ ModelCarMag Forum, or eScale Model Forum.
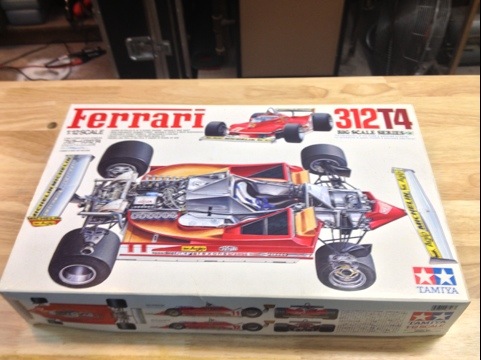
Attached is the box art of the 312T4… This is a highly detailed but broken edition. I will be breaking it down for parts and to build shop components to augment a Ferrari Garage Display. I will also get to practice my idea of using rare earth magnets to hold panels and some components in place. If successful I intend to incorporate into the new 1:12 kits an possibly into some 1:24/25 Enzo’s that I’m building (really unhappy with the fitment of rear engine bay door); maybe I’ll even open a hood on an Enzo or FXX.
Will take some componentry pictures late this week once I asses what damage is done. All the paint that I’ve seen must go and be redone. The body panels are not even painted, just clear coated on the outside. Many items appear to have been detail painted after being installed; I don’t want to build my T4 in the order of the instructions, so this autopsy will go along way for me to figure out how best with my skill set to build F1 cars.
Can be followed over in WIP pages-
Stay tuned

Check out my new WIP at http://wp.me/P1eftU-5e

I have published/updated my Kit List under the scale model hirearchy….. You can reach it here https://beamansw.wordpress.com/scale-models/kit-list/
Thanks for looking
So I have picked up quarts of the following for the local automotive store: Duplicolor Paint Shop Series ; Grey Primer (BSP100), Clear Coat (BSP300), Performance Red (BSP203), Championship White (BSP201), Midnight Blue (BSP210). Read what they have to say about their own product line here: Duplicolor Paint Shop Finish System
I have decided to use a Revell ’57 Chevy as the guinea pig for this since I’ll have the opportunity to have two distinct colors between sides and the rear quarter panel/trunk. I will use Bare Metal Foil (BMF) on the bright work to break it up. The plan right now on the first pass is that I’ll shoot the Grey Primer in light mist coats at ~12 PSI thinned just a bit more with straight acetone from my Iwata HP-C Plus and will control environment with 72 F @ <; 40% Humidity.
I had little to no issues with crazing as I thought I might and the primer built up nicely. The system being premixed and the fact that these lacquers dry so fast, make for no wait time. I'm still not planning on jumping from color to color like a jack rabbit, but if the primer is any indication of how the rest of the system will work for me, then I've got high hopes.
Granted, a quart can do a lot of cars, but even if I only use the primer in the future…. that will be used up easily. More to come with pics too..
So tonight I’m going to put the last layer of the ‘bright idea Kyrlon on the cab, hood and fenders, Since it’s enamel, I plan on wetsanding and laying a clear down net week some time. The powerplant is done anf the frame is already semi gloss black…. still have to buld the springs all the way around to drop it a bit. Along with the Enxo’s this weekend, I finishe the entrior of the cab, Thanks for looking,
V/R, Shannon